Exness Account
This guide will walk you through the steps to register an account on Exness and start trading Forex, ensuring you have a smooth and efficient experience from the very beginning.
How to Register an Account on Exness
How to Register an Exness Account [Web]
How to register an account
1. Open the Exness Broker website and click on the "Open account" in the upper right corner page and the registration form will appear.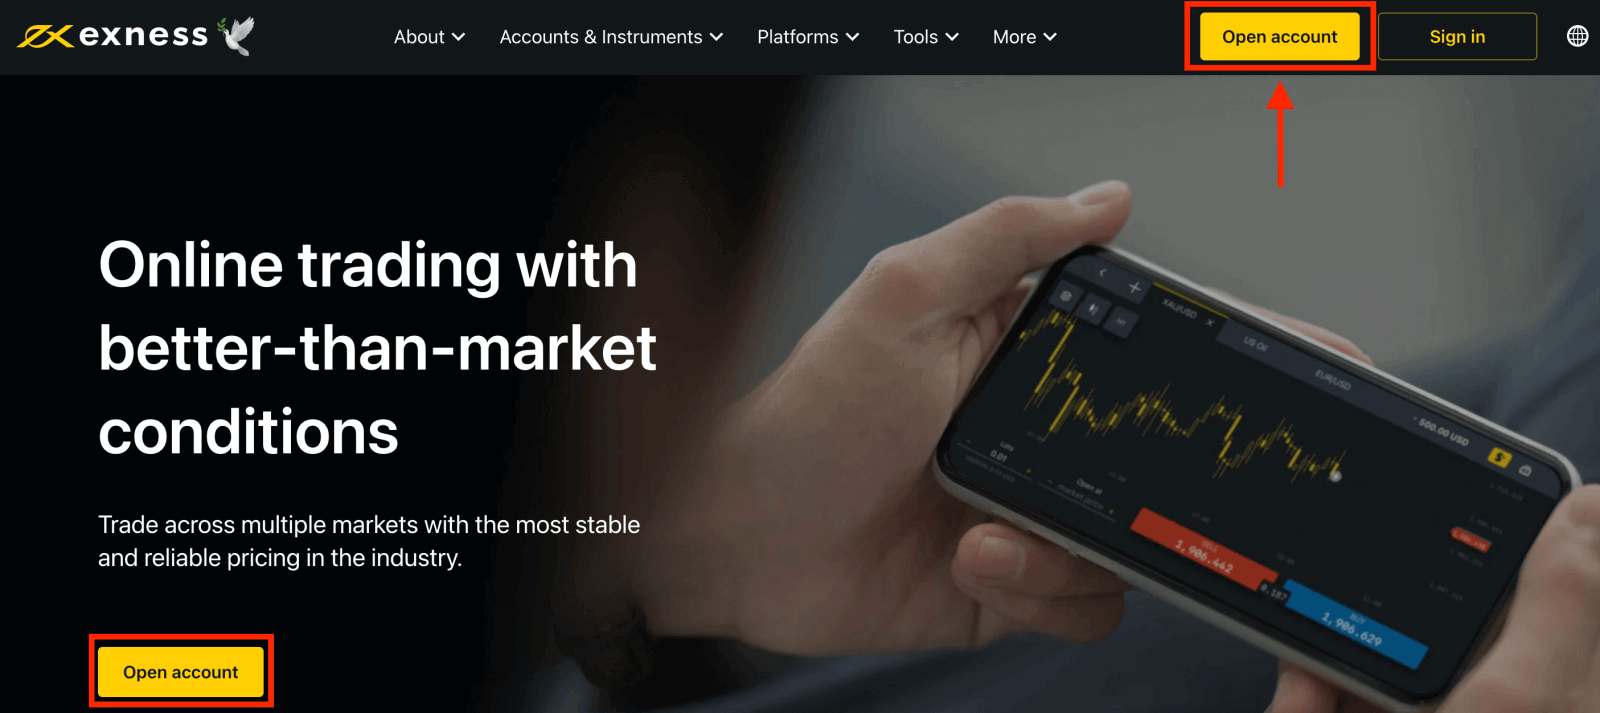
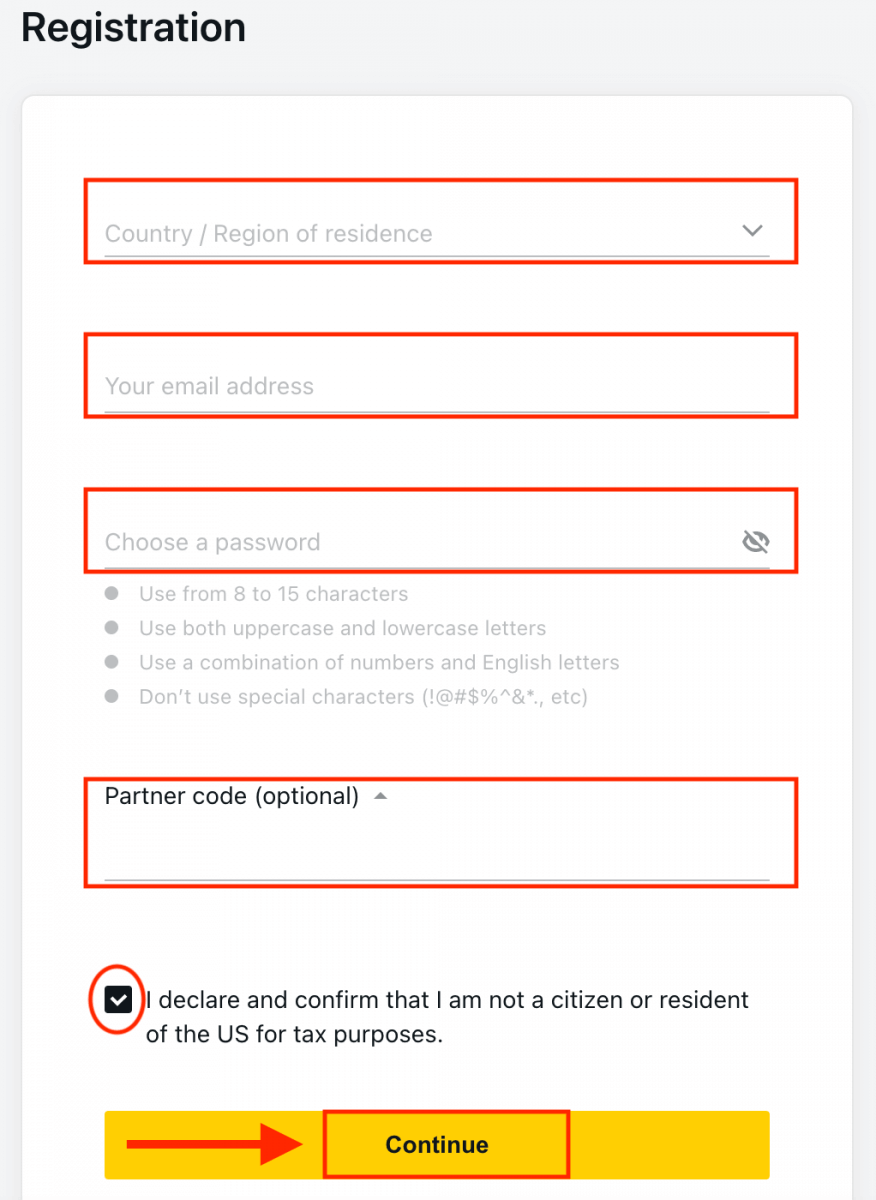
2. At the registration page:
- Select your country of residence; this cannot be changed and will dictate which payment services are available to you.
- Enter your email address.
- Create a password for your Exness account following the guidelines shown.
- Enter a partner code (optional), which will link your Exness account to a partner in the Exness Partnership program.
- Note: in the case of an invalid partner code, this entry field will be cleared so that you can try again.
- Tick the box declaring you are not a citizen or resident of the US if this applies to you.
- Click Continue once you have provided all the required information.
3. Congratulations! Your registration is finished and will be taken to Exness Terminal.
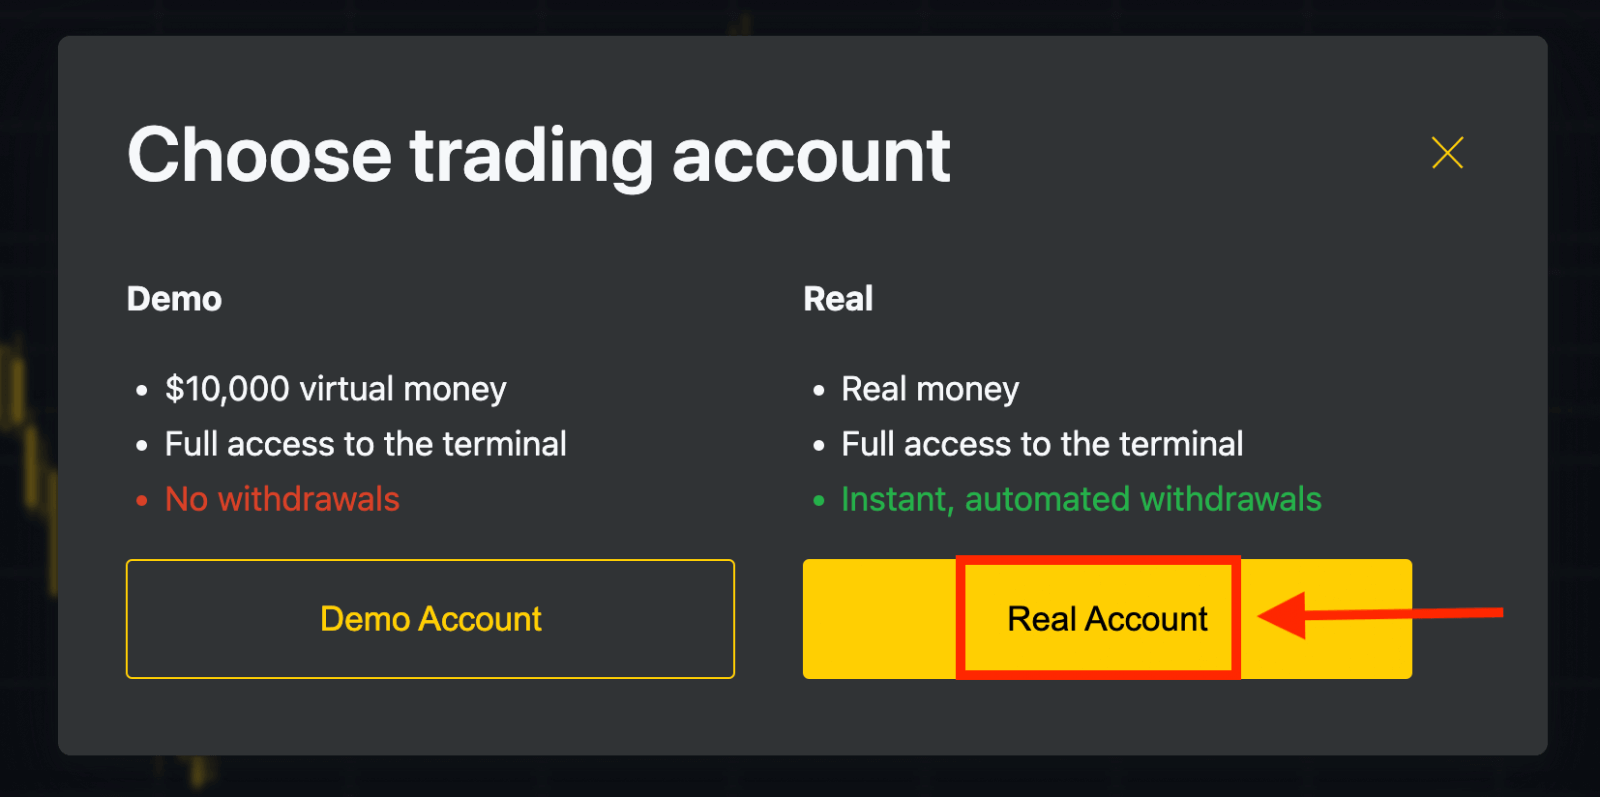
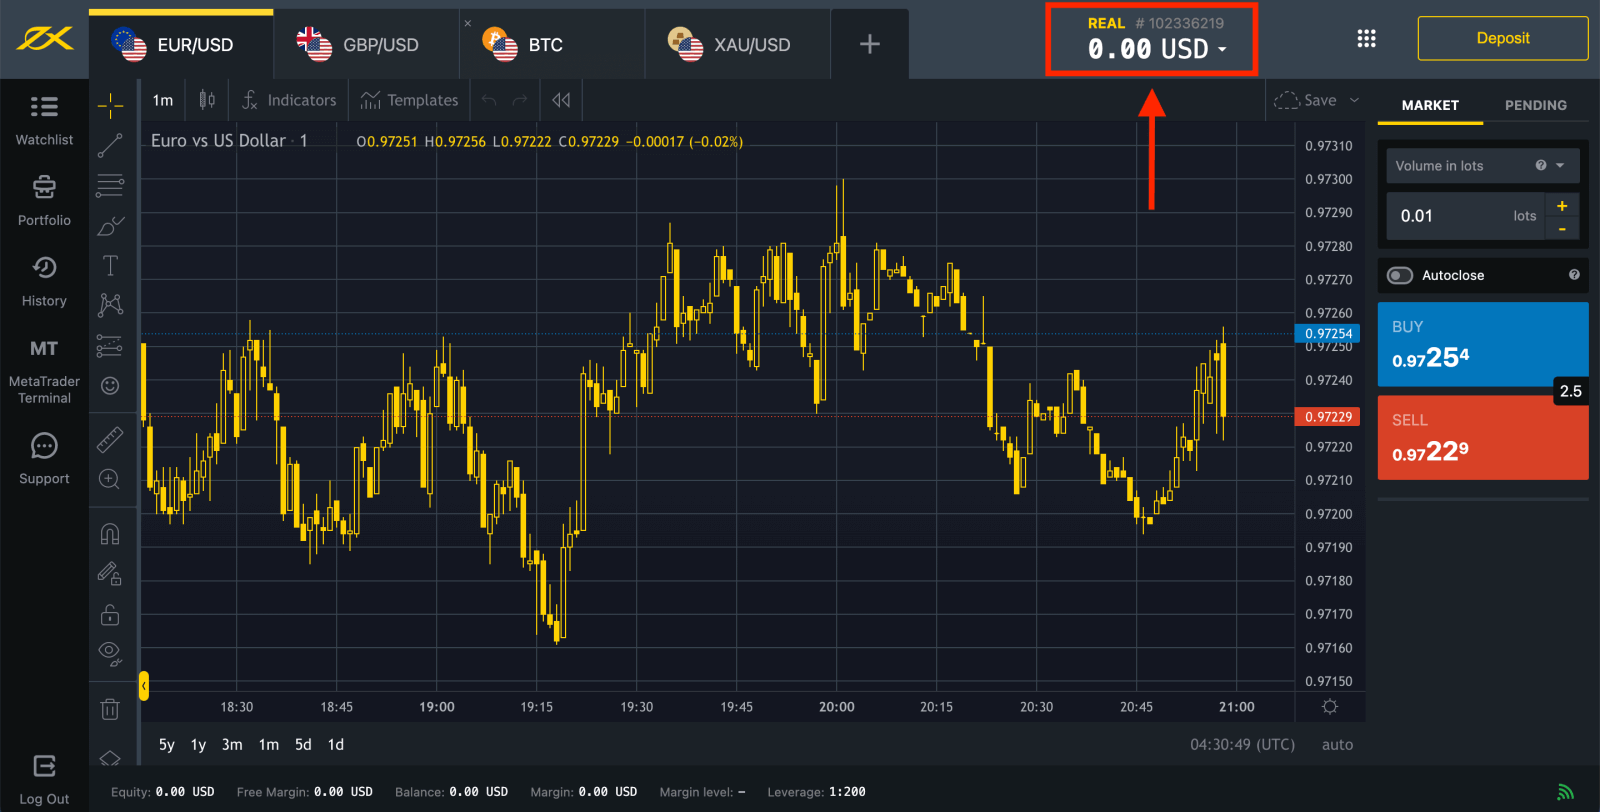
You can trade on a Real account after depositing. Click the "Real Account" yellow button to trade with a real account.
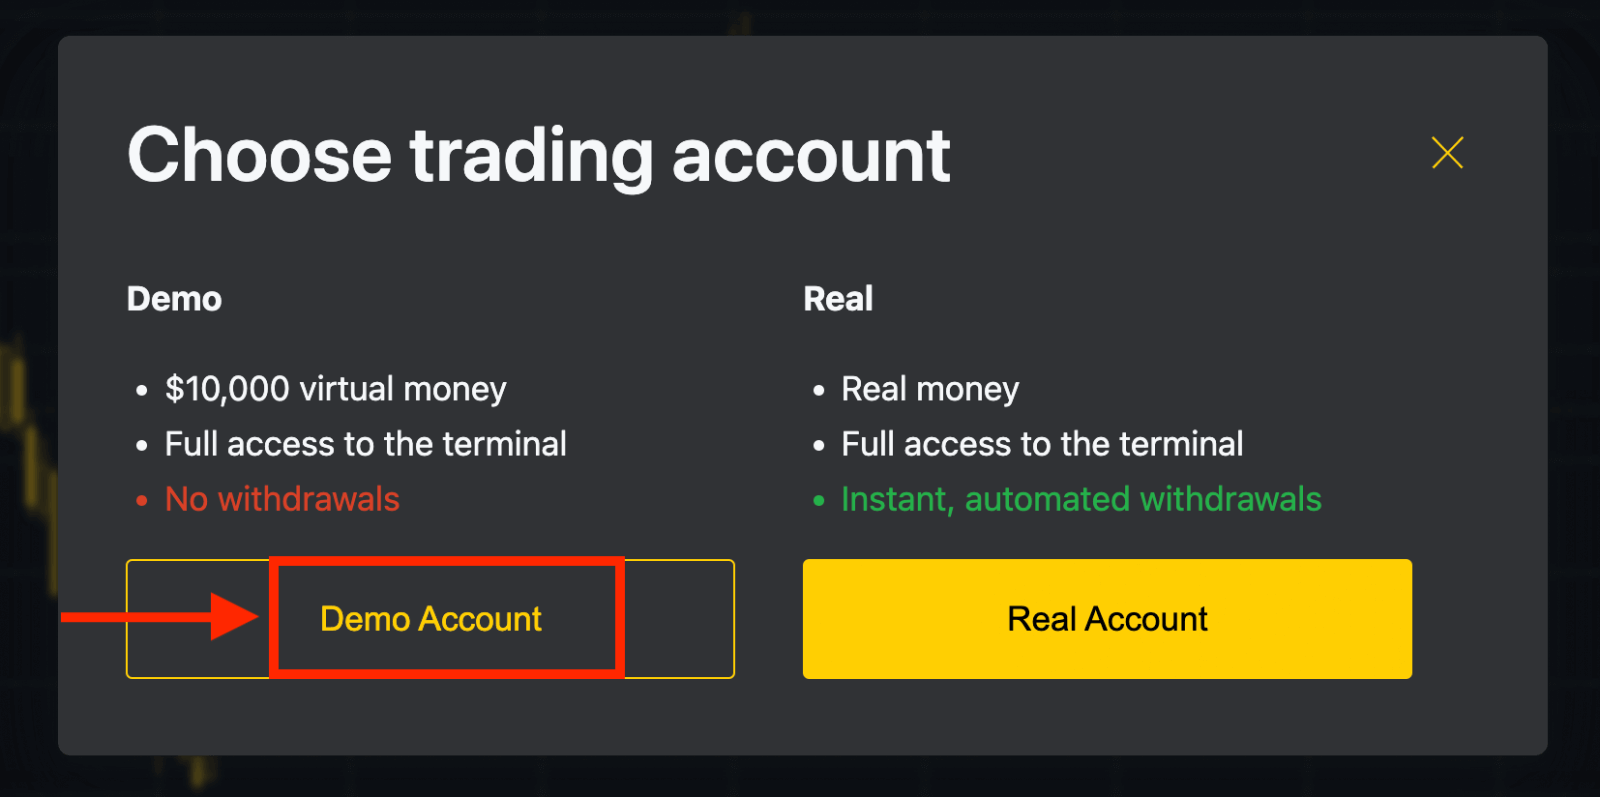
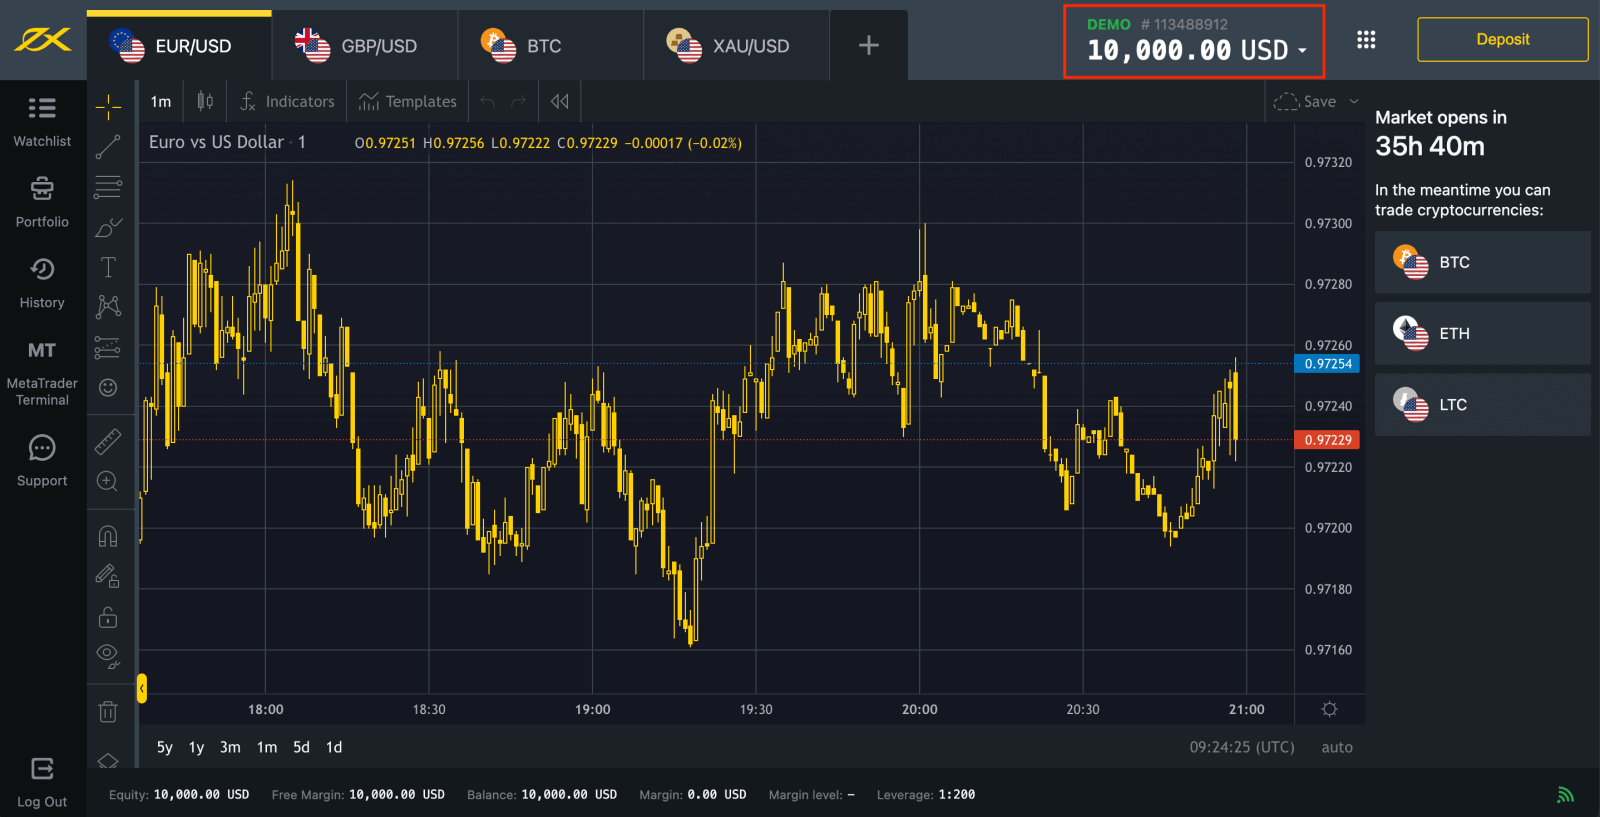
Click the "Demo Account" button to trade with the Demo account.
$10,000 in a Demo account allows you to practice as much as you need for free. You don’t have to spend your own money on trading right away. We offer practice demo accounts, which will let you test investing with virtual money using real market data.
Go to Personal Area to open more trading accounts.
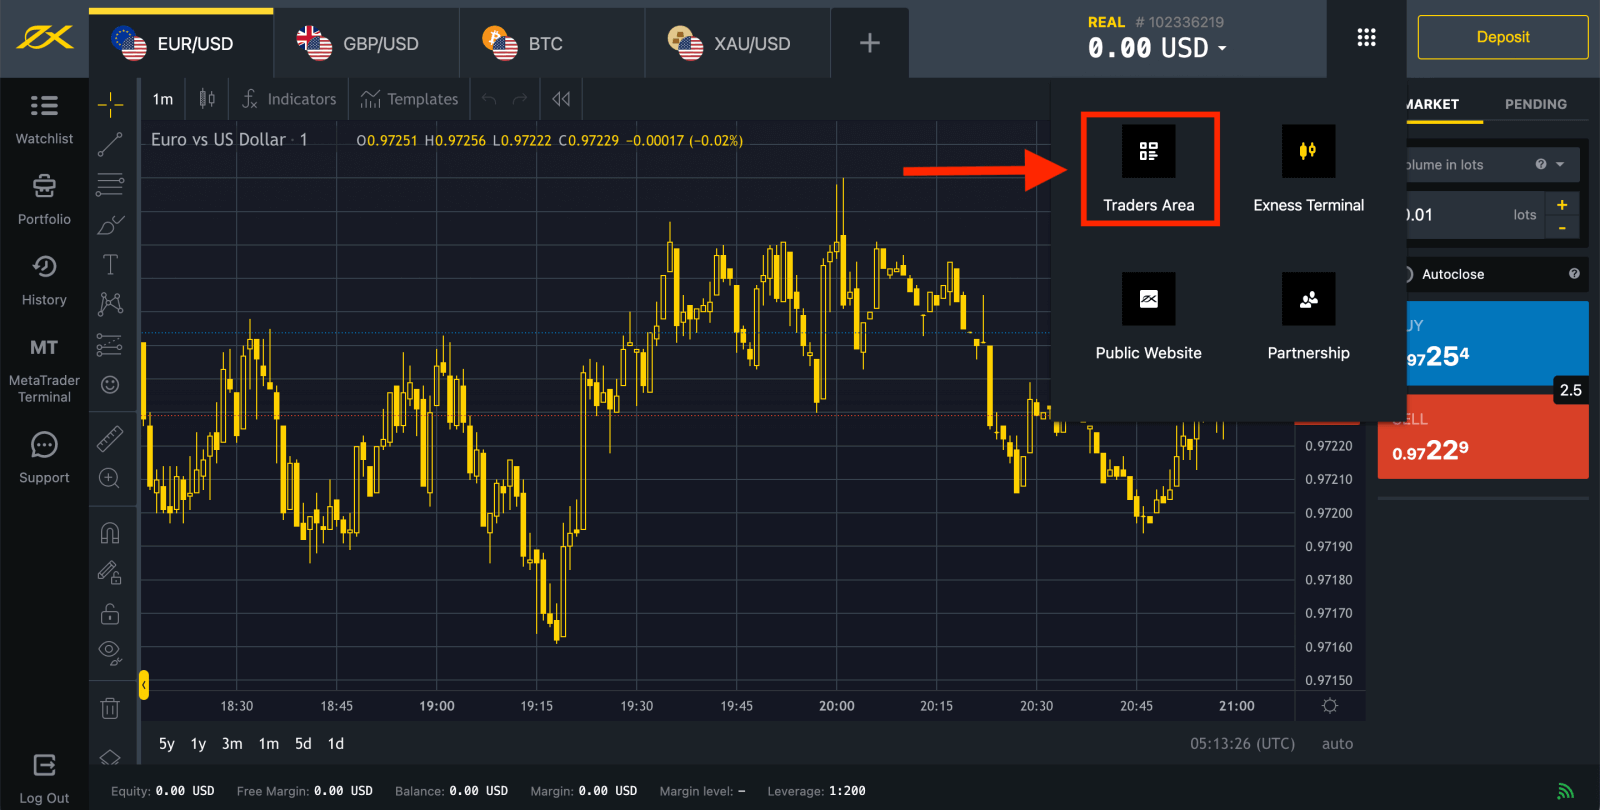
By default, a real trading account and a demo trading account (both for MT5) are created in your new Personal Area; but it is possible to open new trading accounts.
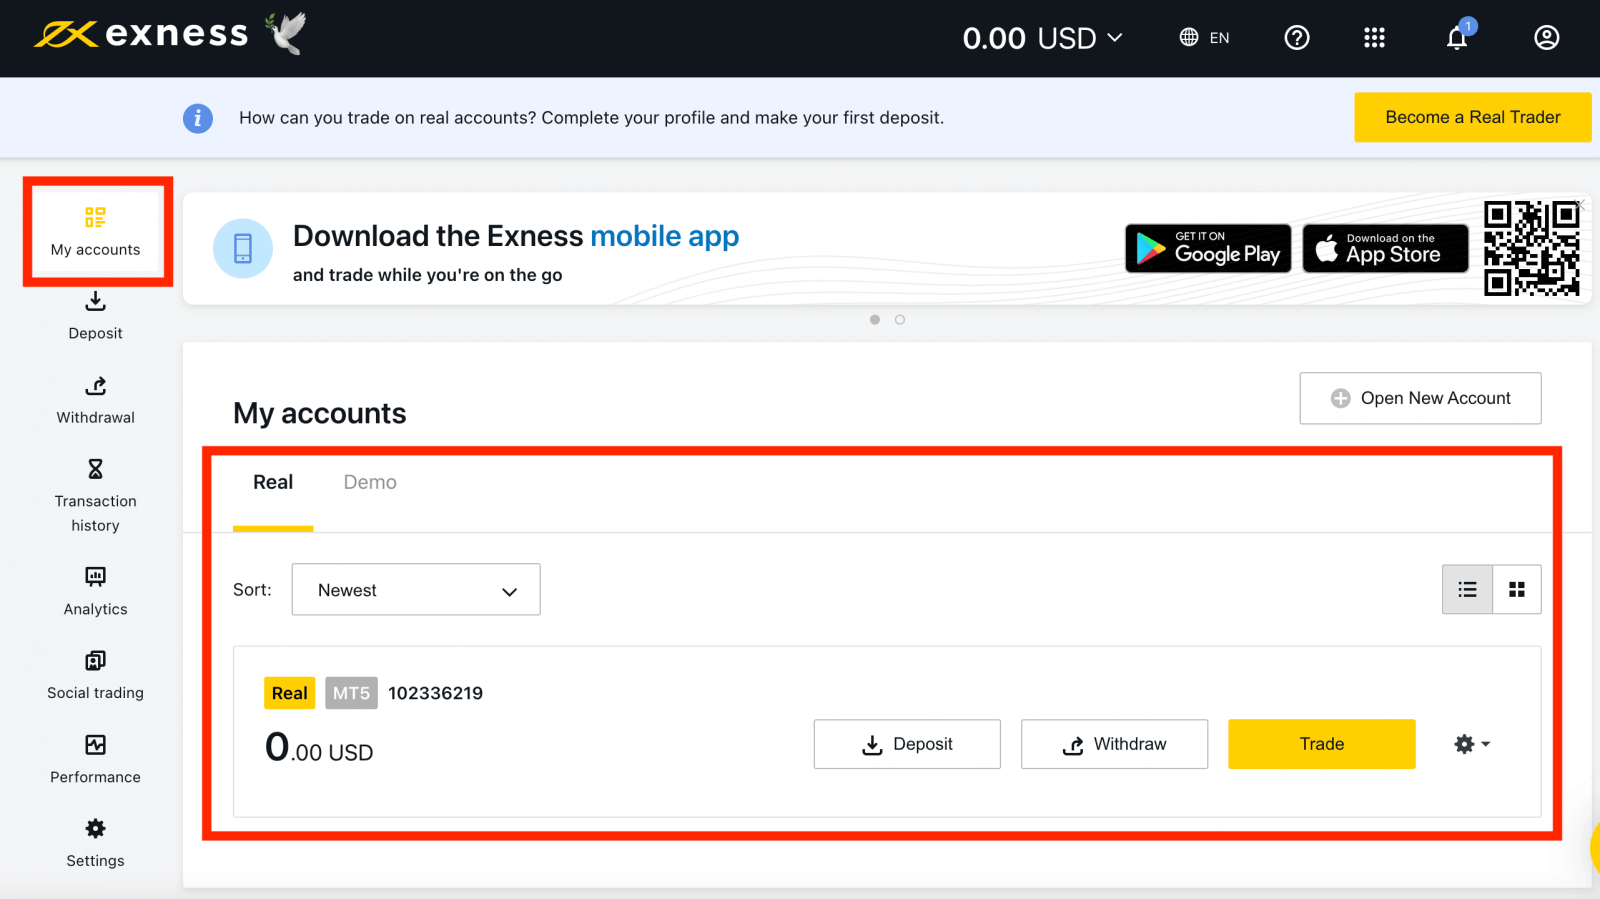
Registering with Exness can be done at any time, even right now!
Once you have registered, it is advised that you fully verify your Exness account to gain access to every feature available only to fully verified Personal Areas.
How to create a new trading account
Here’s how:
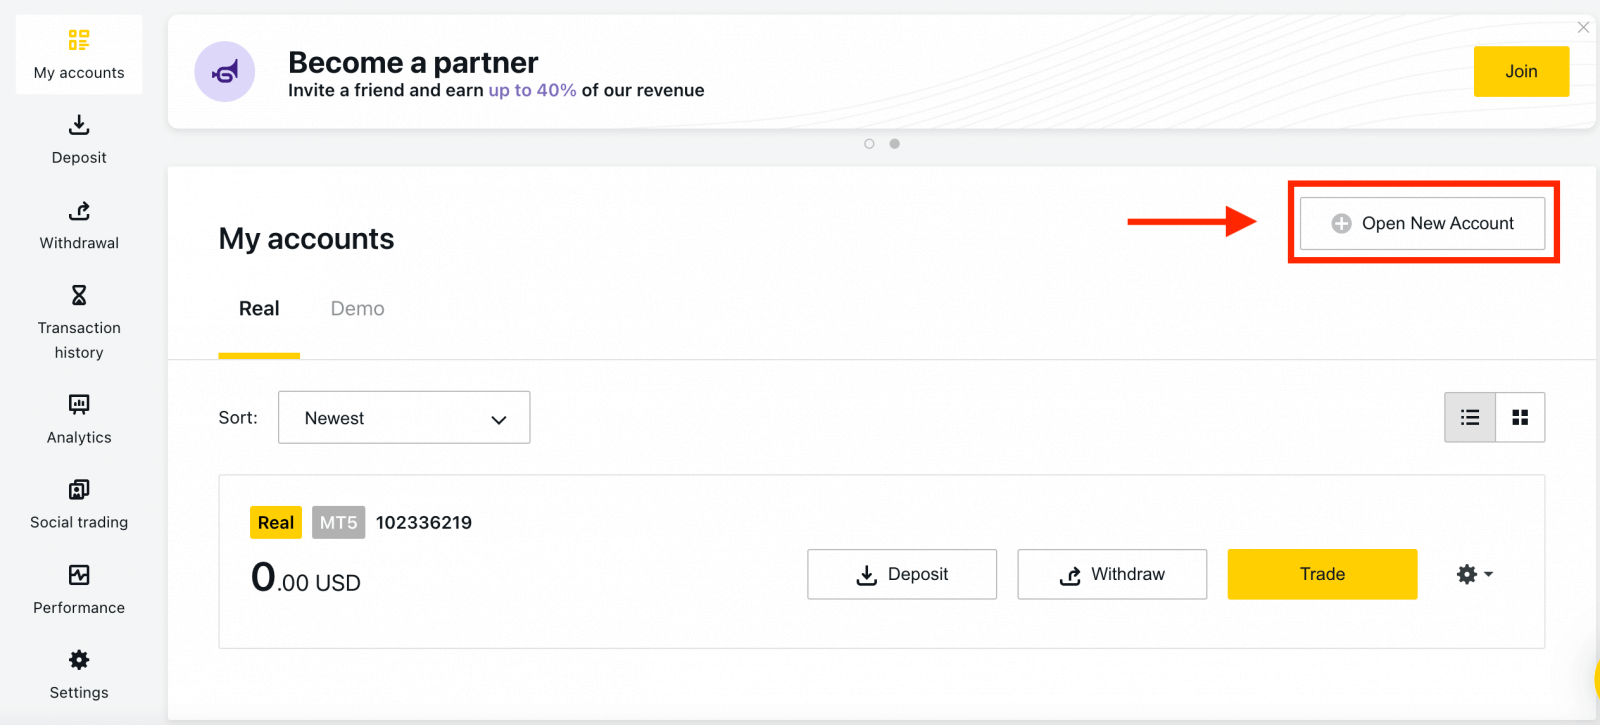
1. From your new Personal Area, click Open New Account in the ‘My Accounts’ area.
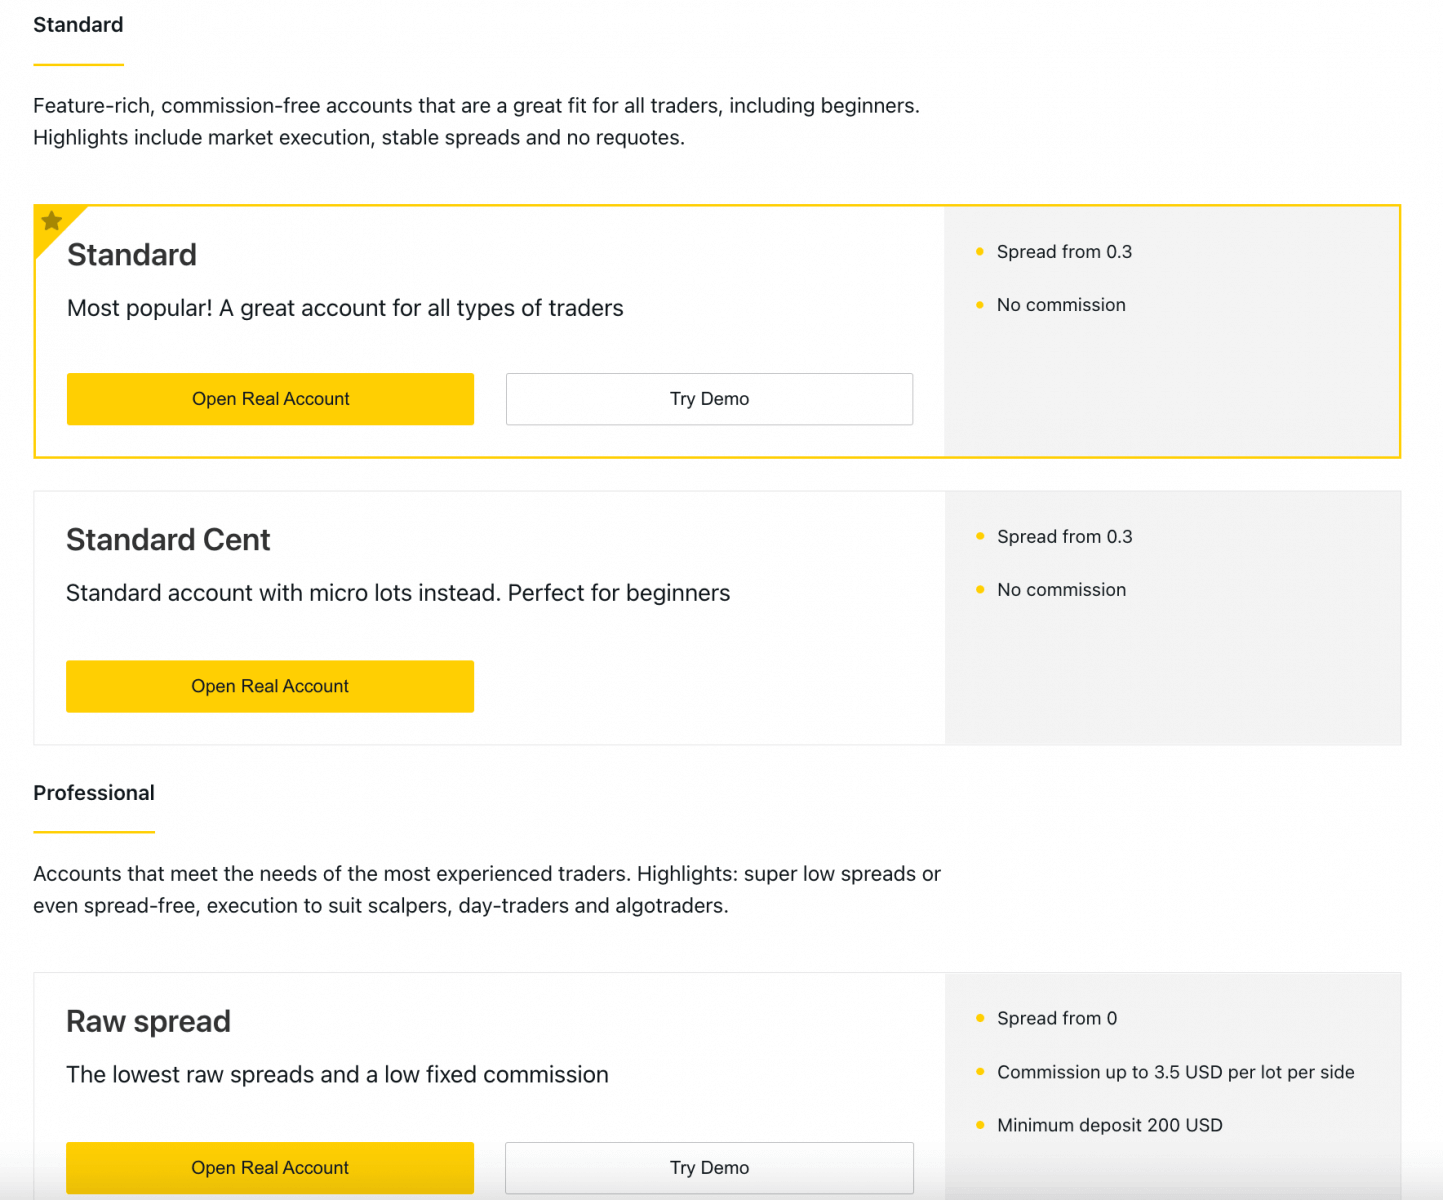
2. Choose from the available trading account types, and whether you prefer a real or demo account.
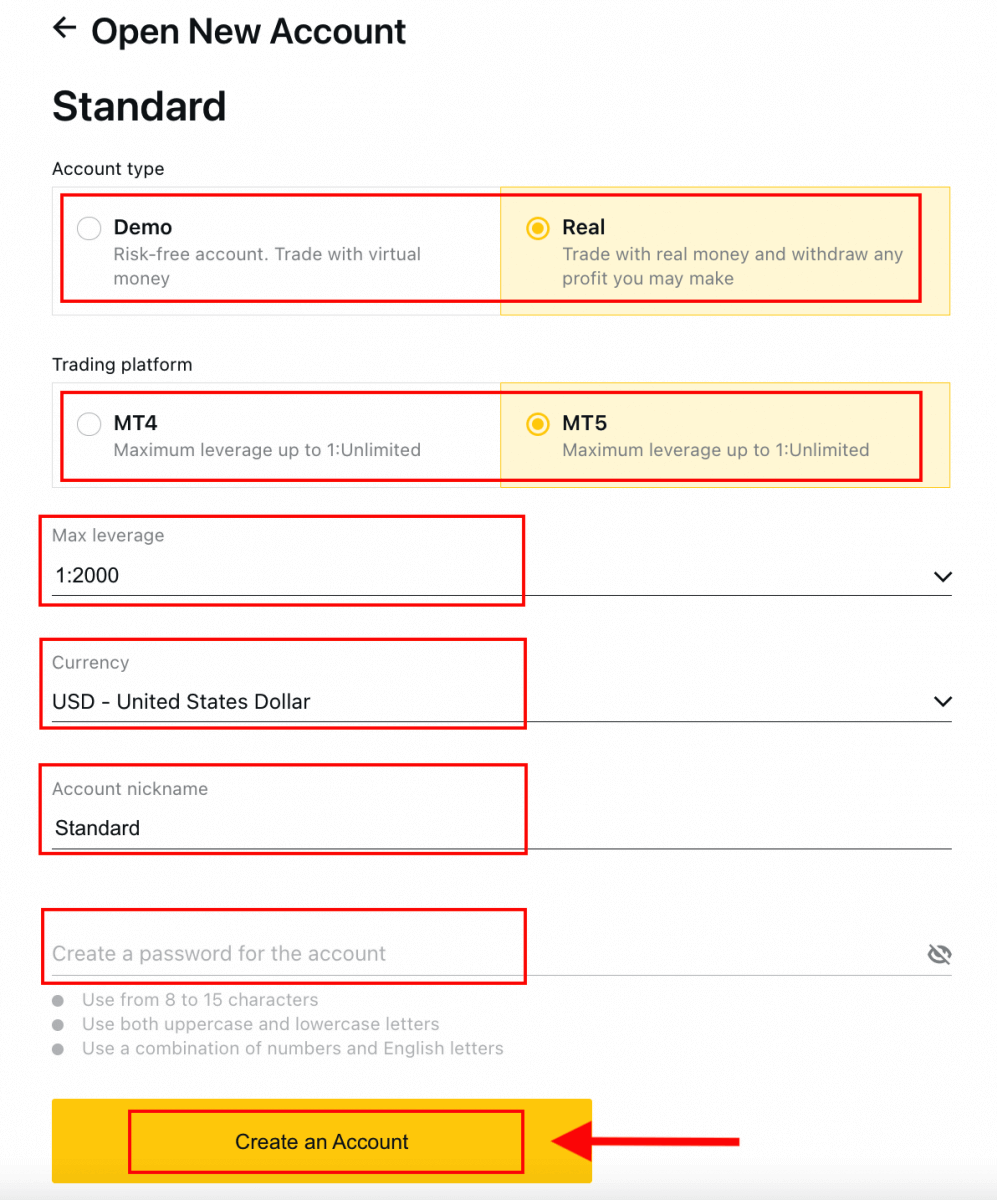
3. The next screen presents the following settings:
- Another chance to select a Real or Demo account.
- A choice between MT4 and MT5 trading terminals.
- Set your Max Leverage.
- Choose your account currency (note that this cannot be changed for this trading account once set).
- Create a nickname for this trading account.
- Set a trading account password.
- Click Create an Account once you are satisfied with your settings.
4. Your new trading account will show up in the ‘My Accounts’ tab.
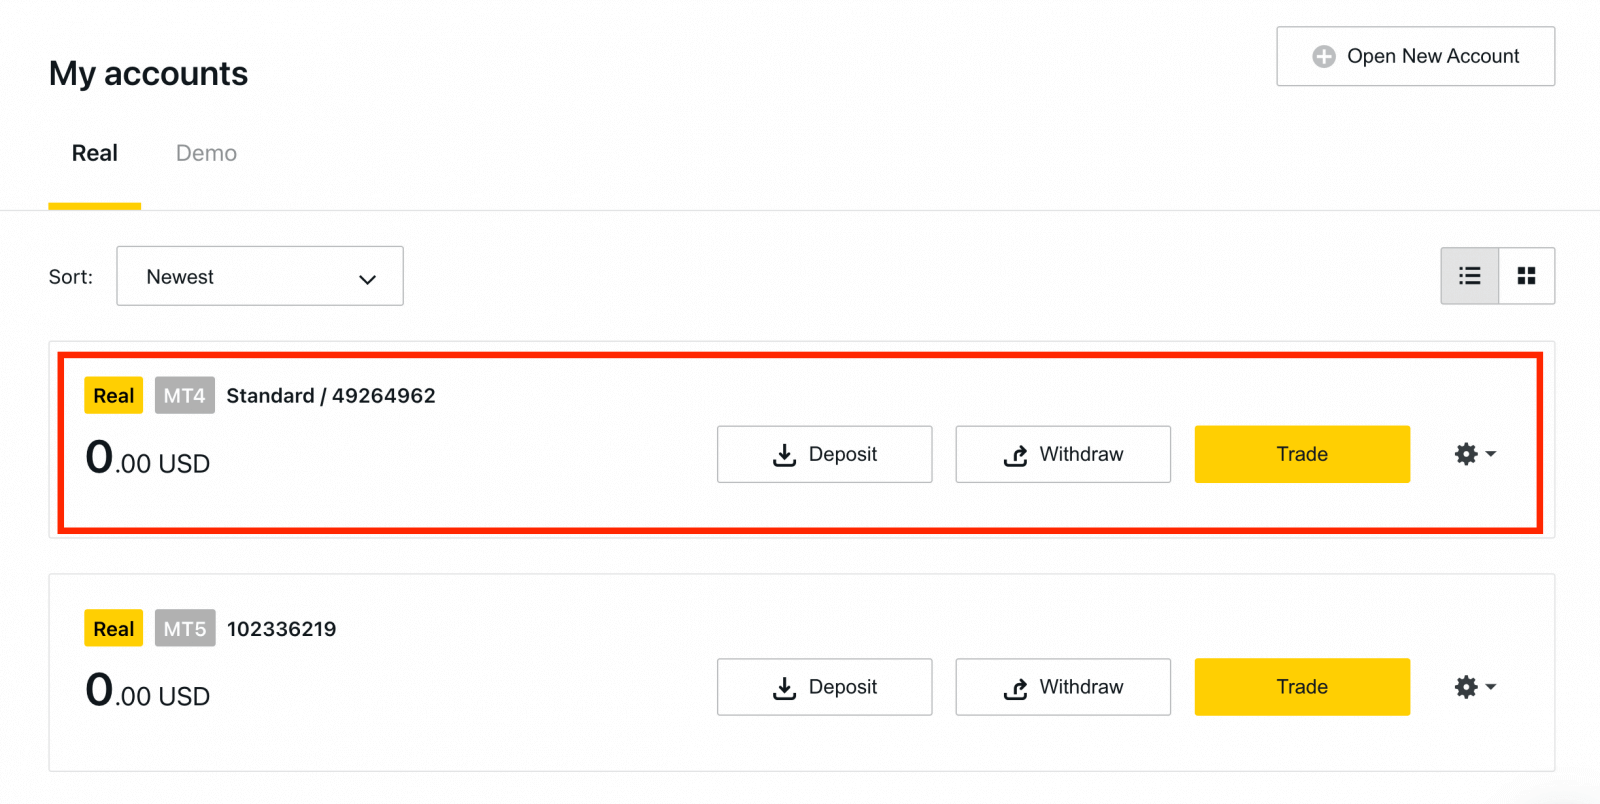
Congratulations, you’ve opened a new trading account.
How to Deposit in Exness
How to Register an Exness Account [App]
Set up and register an account
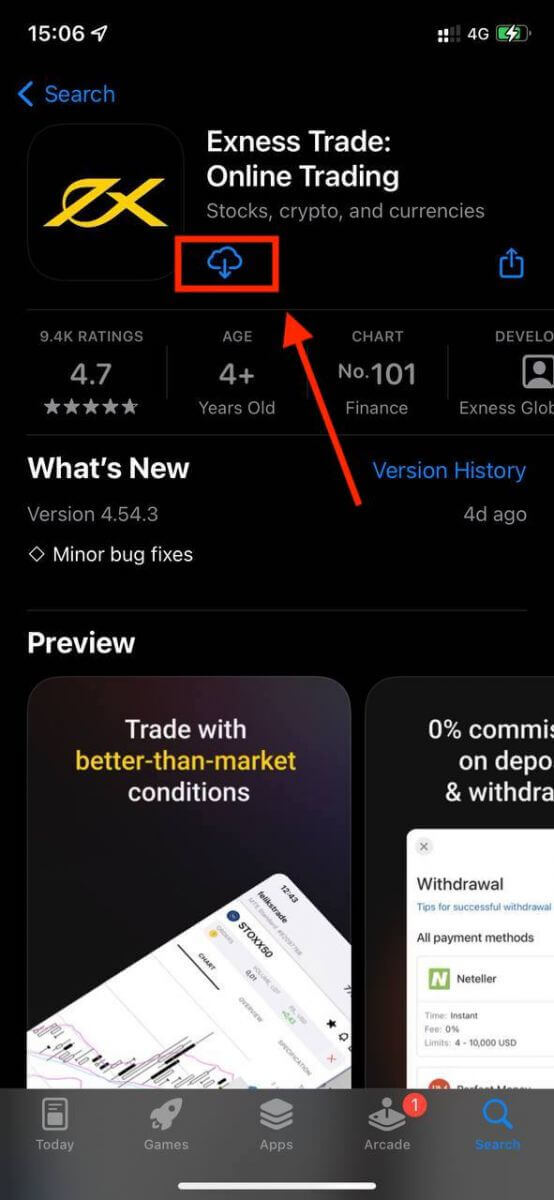
Trade on the go, straight from your phone with Exness mobile app.1. Download the Exness Trader app from the App Store or Google Play.
2. Install and load Exness Trader.
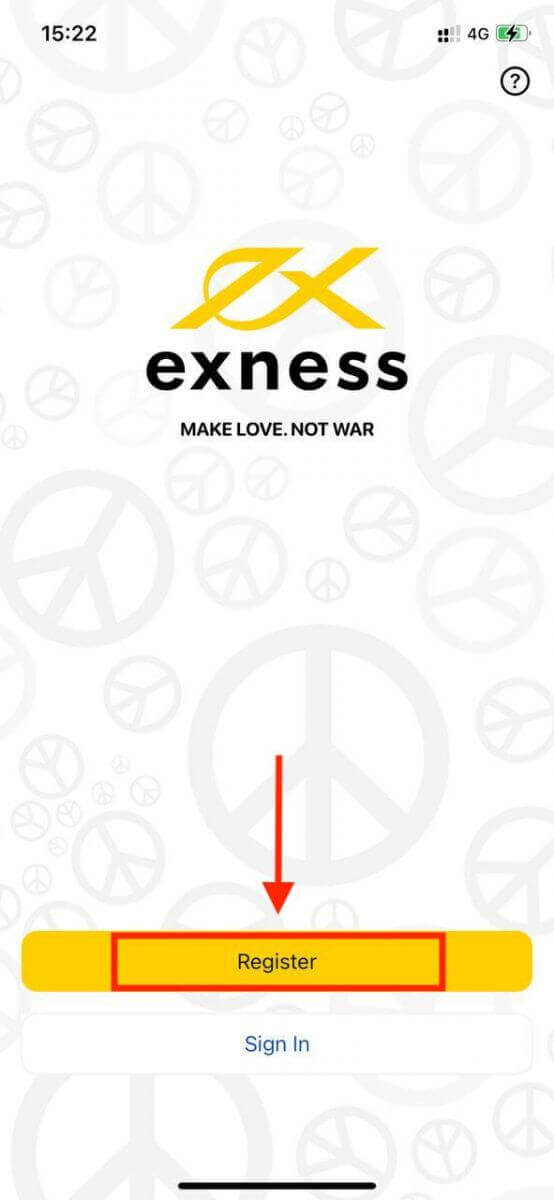
3. Tap Register.
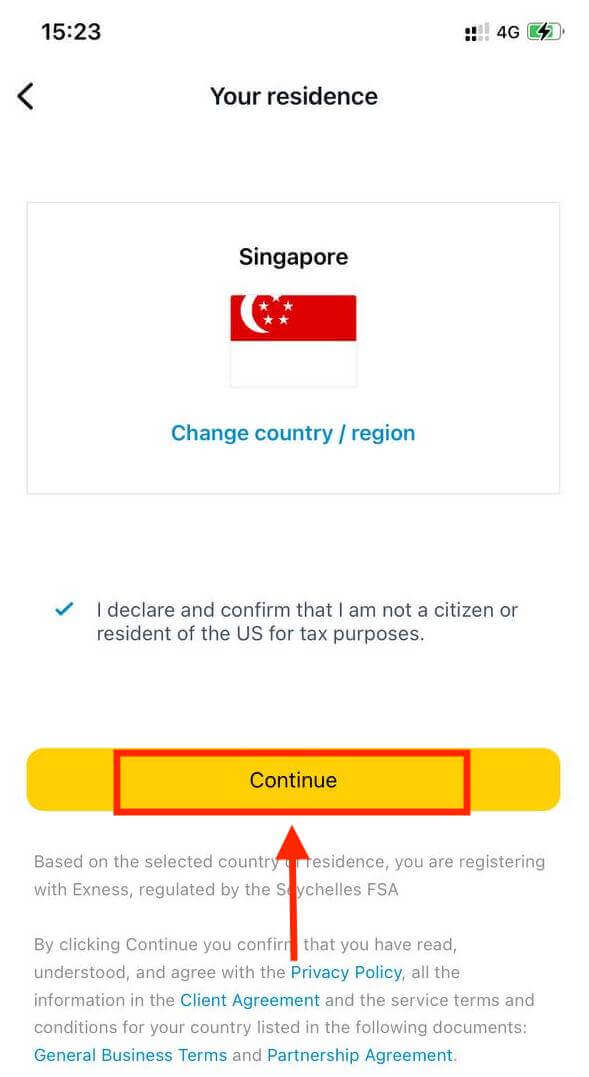
4. Tap Change Country/Region to select your country of residence from the list, then tap Continue.
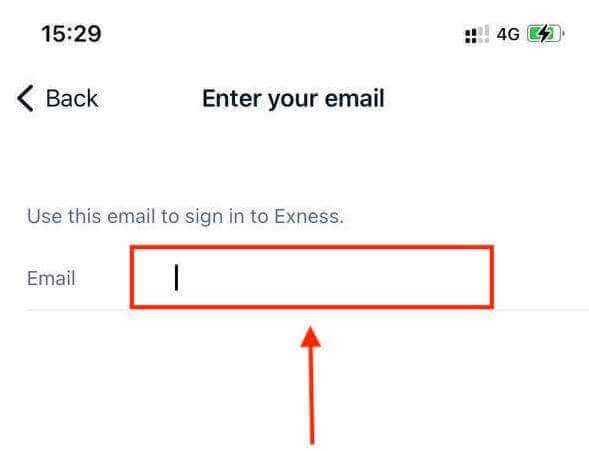
5. Enter your email address and Continue.
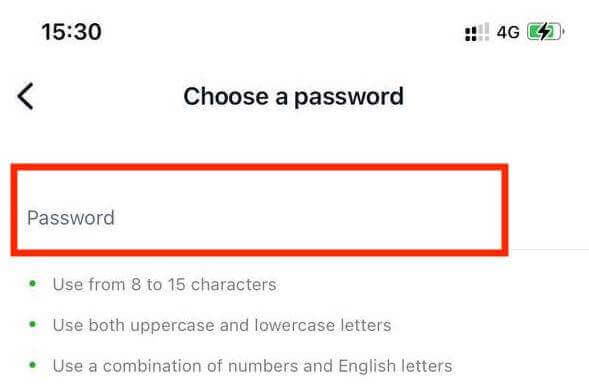
6. Create a password that meets the requirements. Tap Continue.
7. Provide your phone number and tap Send me a code.
8. Enter the 6-digit verification code sent to your phone number, then tap Continue. You can tap Resend me a code if the time runs out.
9. Create a 6-digit passcode, and then re-enter it to confirm. This is not optional, and must be completed before you can enter Exness Trader.
10. You can set up biometrics by tapping Allow if your device supports it, or you can skip this step by tapping Not now.
11. The deposit screen will be presented, but you can tap back to return to the main area of the app.
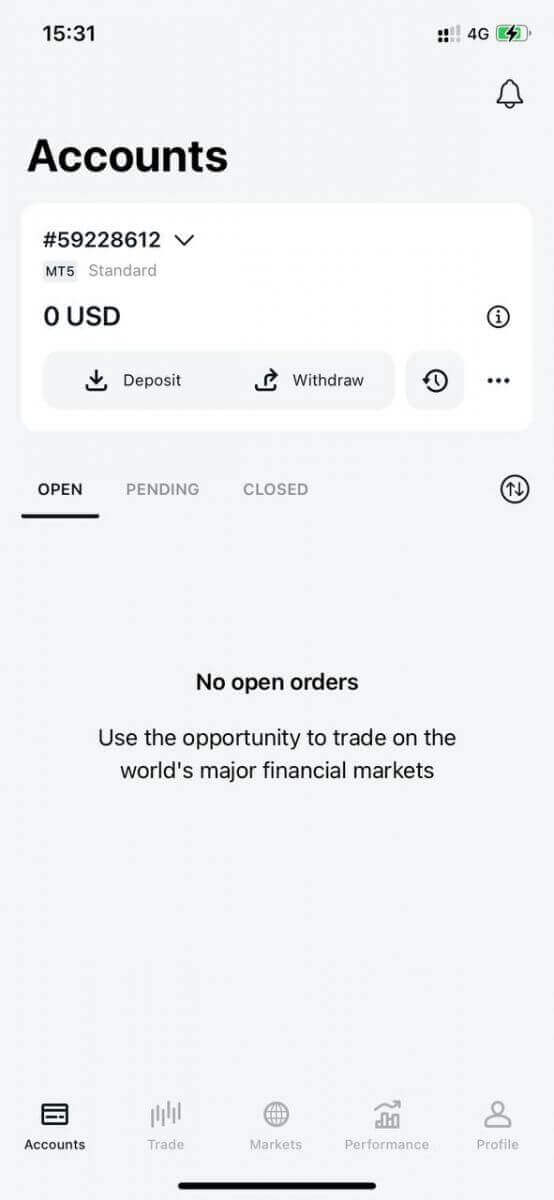
Congratulations, Exness Trader is set up and ready to use.
Upon registration, a demo account is created for you (with USD 10 000 virtual funds) to practice trading.
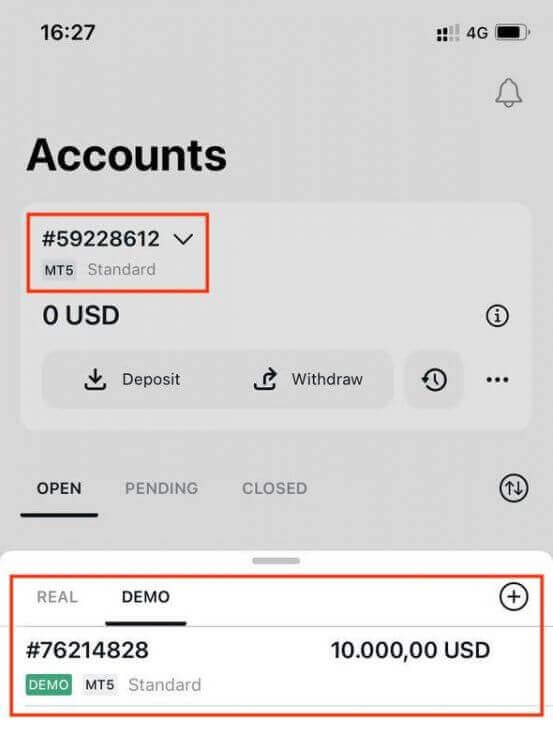
Along with a demo account, a real account is also created for you upon registration.
How to create a new trading account
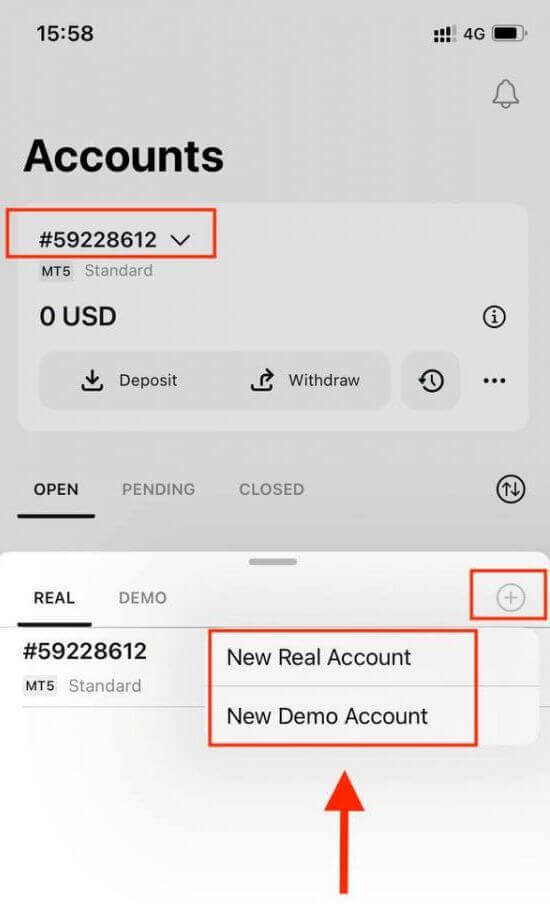
Once you have registered your Personal Area, let us take you through how to create a trading account on the Exness Trader App.1. Tap on the dropdown menu on your Accounts tab on your main screen.
2. Click on the plus sign on the right side and select New Real Account or New Demo Account.
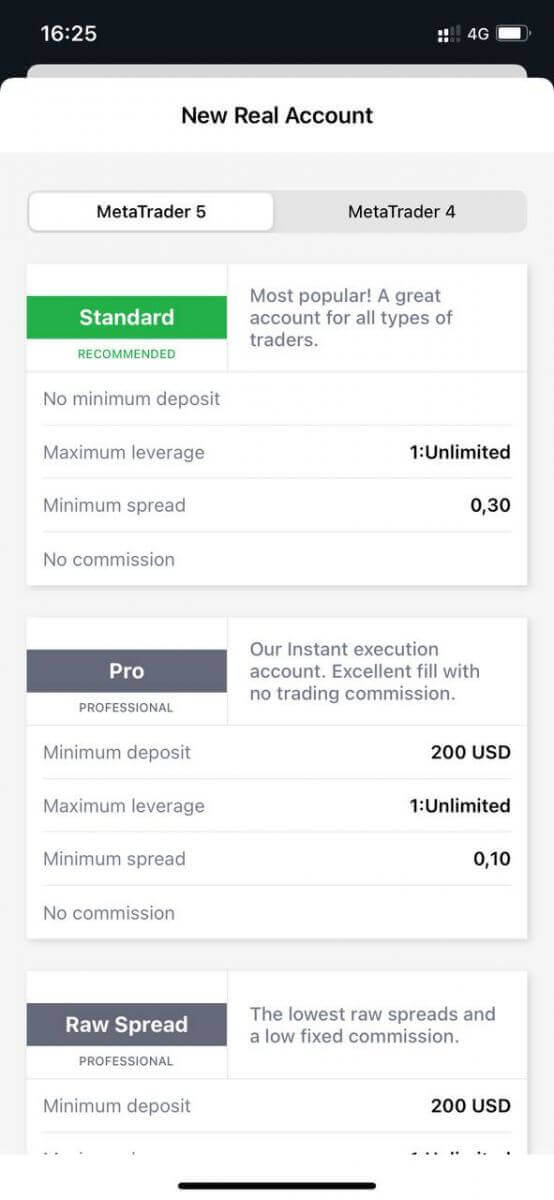
3. Choose your preferred account type under MetaTrader 5 and MetaTrader 4 fields.
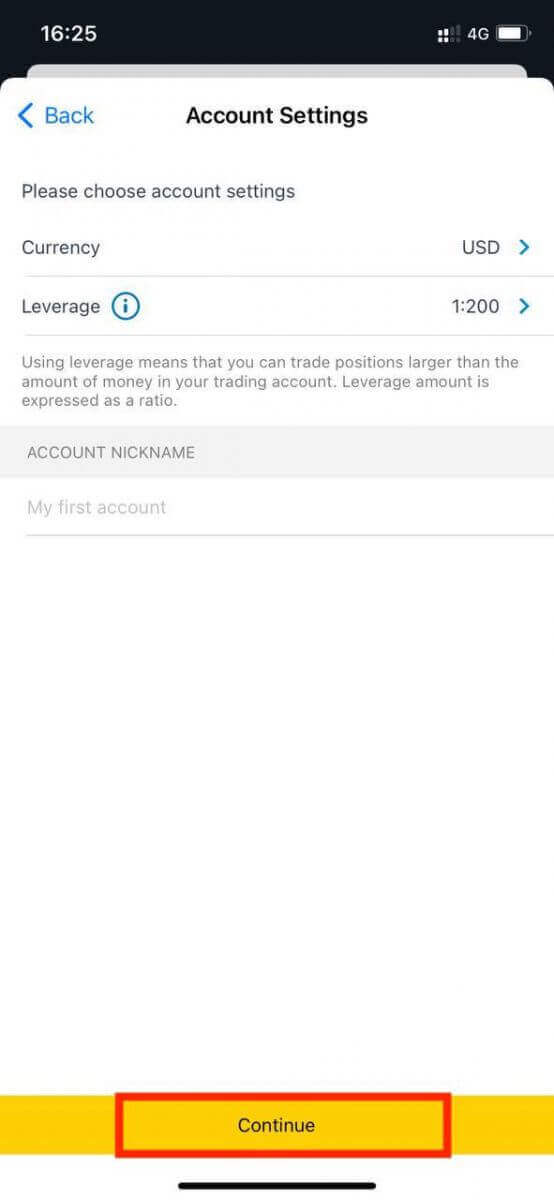
4. Set the account currency, leverage, and enter the account nickname. Tap Continue.
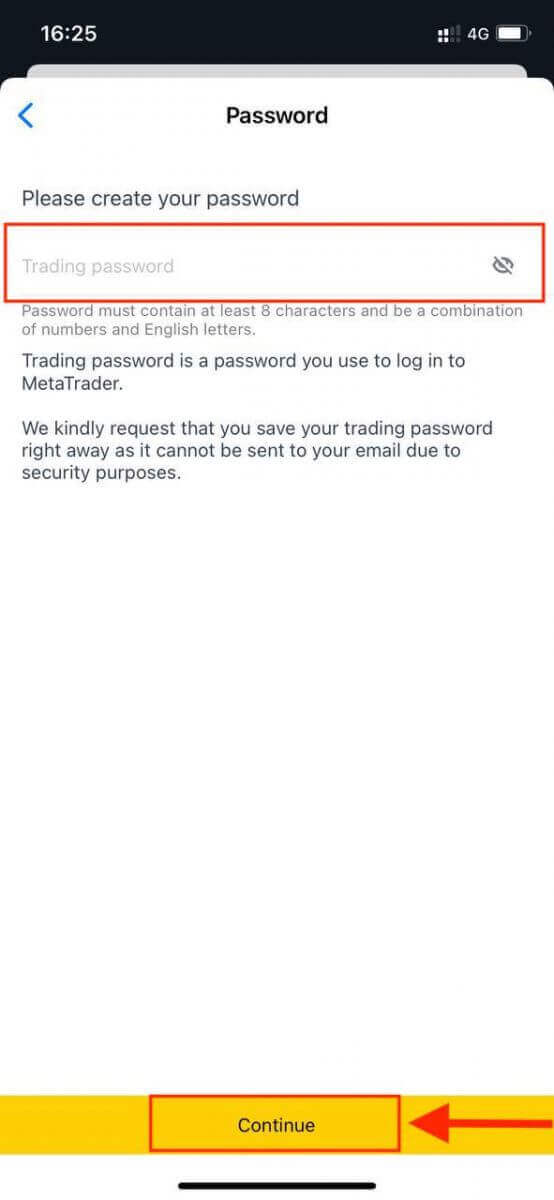
5. Set a trading password as per the displayed requirements.
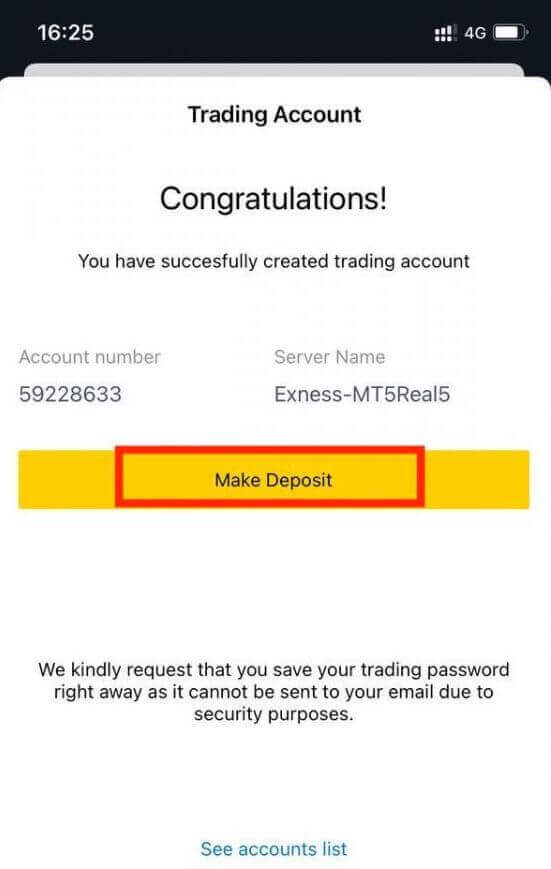
You have successfully created a trading account. Tap Make Deposit to choose a payment method to deposit funds and then tap Trade.
Your new trading account will present below.
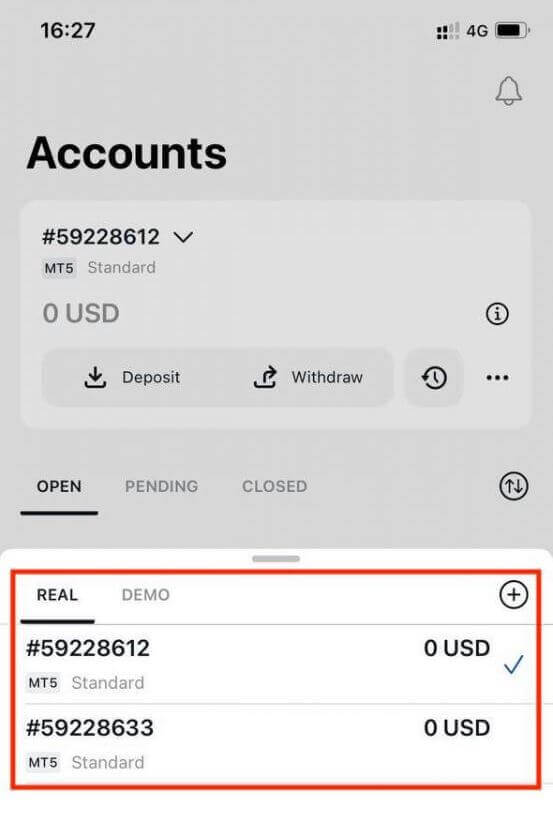
Note that the account currency set for an account cannot be changed once set. If you wish to change your account nickname, you can do so by logging on to the web Personal Area.
How to Trade on Exness
How to place a New Order on Exness MT4
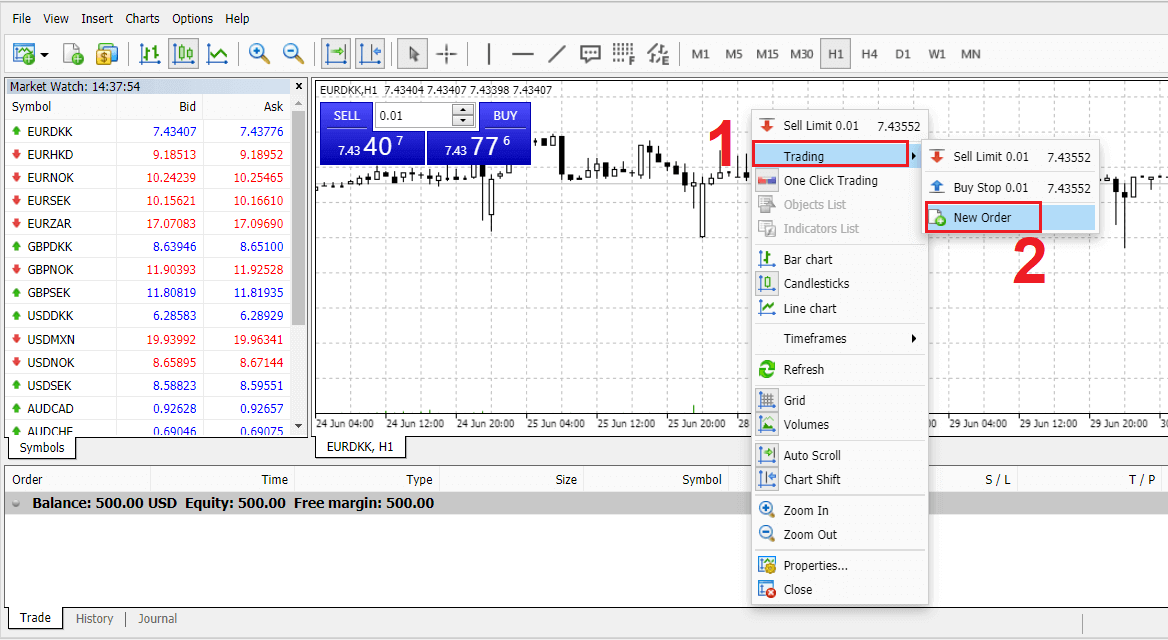
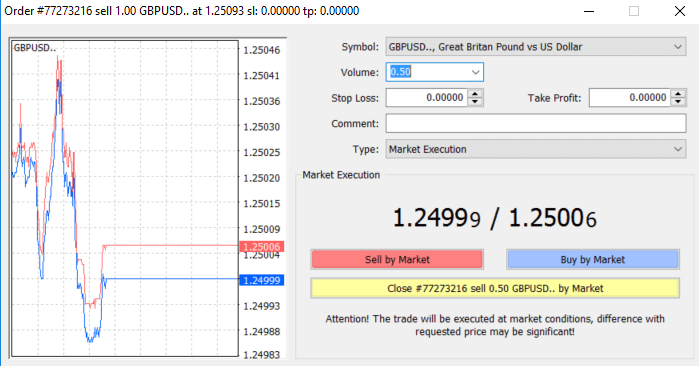
Right click the chart, Then click “Trading" → select “New Order".Or
Double click on the currency you want to place an order on MT4. The Order window will appear
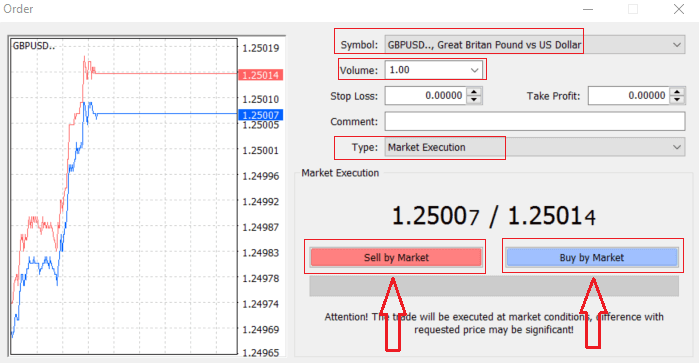
Symbol: check the Currency symbol you wish to trade is displayed in the symbol box
Volume: you must decide the size of your contract, you can click on the arrow and choose the volume from the listed options of the drop-down box or left click in the volume box and type in the required value
Don’t forget that your contract size directly affects your possible profit or loss.
Comment: this section is not obligatory but you can use it to identify your trades by adding comments
Type: which is set to market execution by default,
- Market Execution is the model of executing orders at the current markets price
- Pending Order is used to set up a future price that you intend to open your trade with.
Finally, you need to decide what order type to open, you can choose between a sell and a buy order
Sell by Market are opened at bid price and closed at ask price, in this order type your trade may bring profit if the price goes down
Buy by Market are opened at ask price and closed at bid price, in this order type your trade may bring profit It the price goes up
Once you click on either Buy or Sell, your order will be instantly processed, you can check your order in the Trade Terminal

How to place a Pending Order on Exness MT4
How Many Pending Orders
Unlike instant execution orders, where a trade is placed at the current market price, pending orders allow you to set orders that are opened once the price reaches a relevant level, chosen by you. There are four types of pending orders available, but we can group them into just two main types:
- Orders expecting to break a certain market level
- Orders expecting to bounce back from a certain market level

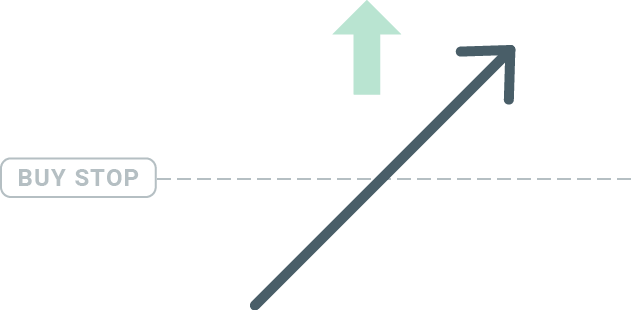
Buy Stop
The Buy Stop order allows you to set a buy order above the current market price. This means that if the current market price is $20 and your Buy Stop is $22, a buy or long position will be opened once the market reaches that price.
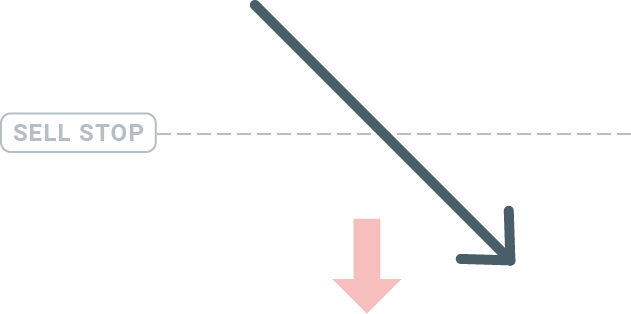
Sell Stop
The Sell Stop order allows you to set a sell order below the current market price. So if the current market price is $20 and your Sell Stop price is $18, a sell or ‘short’ position will be opened once the market reaches that price.
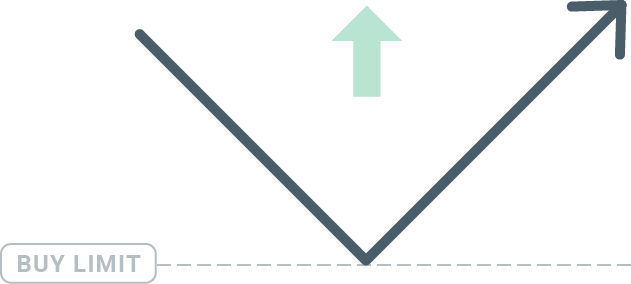
Buy Limit
The opposite of a buy stop, the Buy Limit order allows you to set a buy order below the current market price. This means that if the current market price is $20 and your Buy Limit price is $18, then once the market reaches the price level of $18, a buy position will be opened.
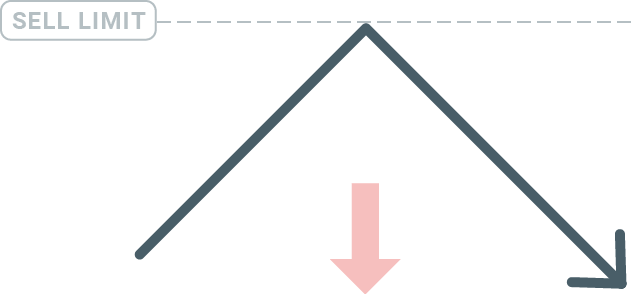
Sell Limit
Finally, the Sell Limit order allows you to set a sell order above the current market price. So if the current market price is $20 and the set Sell Limit price is $22, then once the market reaches the price level of $22, a sell position will be opened on this market.
Opening Pending Orders
You can open a new pending order simply by double-clicking on the name of the market on the Market Watch module. Once you do so, the new order window will open and you will be able to change the order type to Pending order.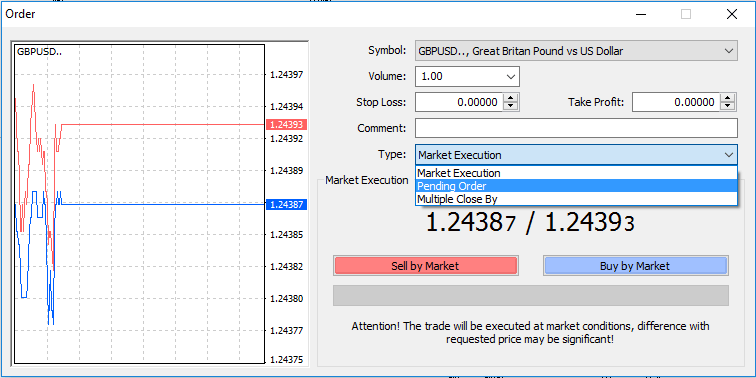
Next, select the market level at which the pending order will be activated. You should also choose the size of the position based on the volume.
If necessary, you can set an expiration date (‘Expiry’). Once all these parameters are set, select a desirable order type depending on whether you would like to go long or short and stop or limit and select the ‘Place’ button.
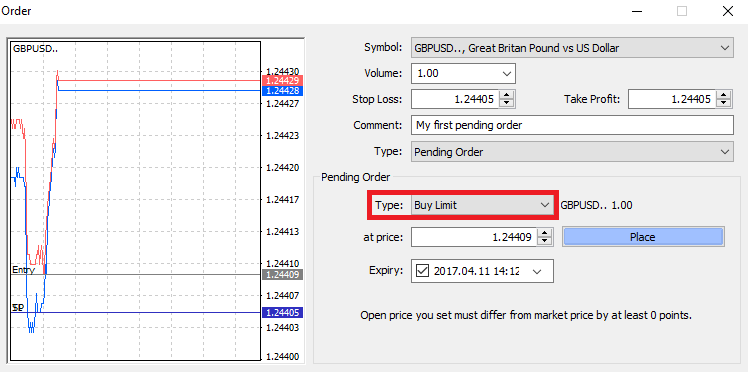
As you can see, pending orders are very powerful features of MT4. They are most useful when you’re not able to constantly watch the market for your entry point, or if the price of an instrument changes quickly, and you don’t want to miss the opportunity.
How to close Orders on Exness MT4
To close an open position, click the ‘x’ in the Trade tab in the Terminal window.
Or right-click the line order on the chart and select ‘close’.
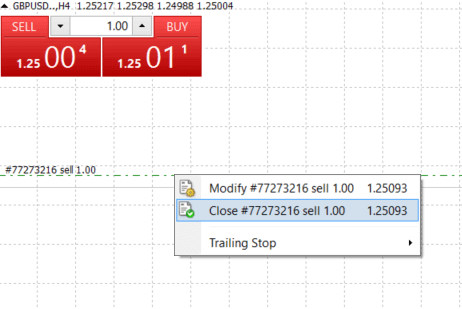
If you’d like to close only a part of position, click right-click on the open order and select ‘Modify’. Then, in the Type field, select instant execution and choose what part of the position you want to close.
As you can see, opening and closing your trades on MT4 is very intuitive, and it literally takes just one click.
Using Stop Loss, Take Profit and Trailing Stop on Exness MT4
One of the keys to achieving success in financial markets over the long term is prudent risk management. That’s why stop losses and take profits should be an integral part of your trading.So let’s have a look at how to use them on our MT4 platform to ensure you know how to limit your risk and maximize your trading potential.
Setting Stop Loss and Take Profit
The first and the easiest way to add Stop Loss or Take Profit to your trade is by doing it right away, when placing new orders.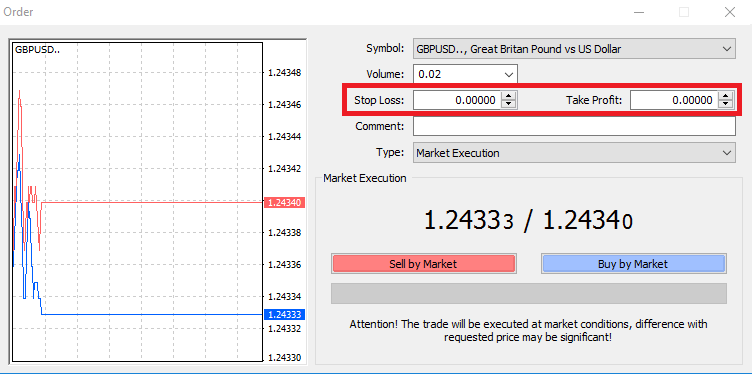
To do this, simply enter your particular price level in Stop Loss or Take Profit fields. Remember that Stop Loss will be executed automatically when the market moves against your position (hence the name: stop losses), and Take Profit levels will be executed automatically when the price reaches your specified profit target. This means that you’re able to set your Stop Loss level below the current market price and Take Profit level above current market price.
It’s important to remember that a Stop Loss (SL) or a Take Profit (TP) is always connected to an open position or a pending order. You can adjust both once your trade has been opened and you’re monitoring the market. It’s a protective order to your market position, but of course they are not necessary to open a new position. You always can add them later, but we highly recommend to always protect your positions*.
Adding Stop Loss and Take Profit Levels
The easiest way to add SL/TP levels to your already opened position is by a using trade line on the chart. To do so, simply drag and drop the trade line up or down to specific level.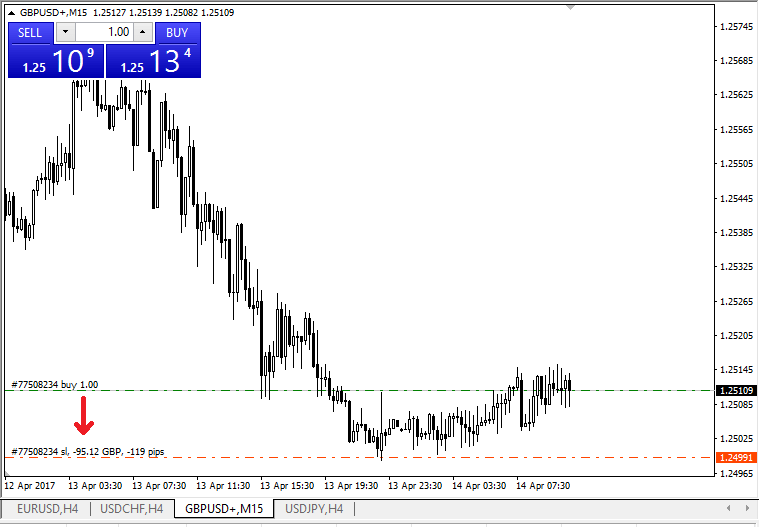
Once you’ve entered SL/TP levels, the SL/TP lines will appear on the chart. This way you can also modify SL/TP levels simply and quickly.
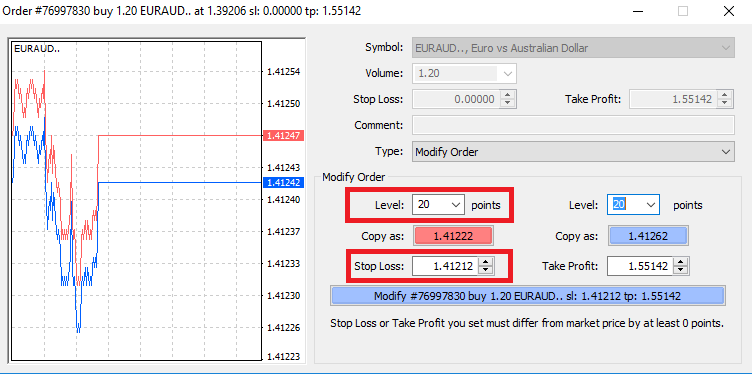
You can also do this from the bottom ‘Terminal’ module as well. To add or modify SL/TP levels, simply right-click on your open position or pending order, and choose ‘Modify or delete order’.
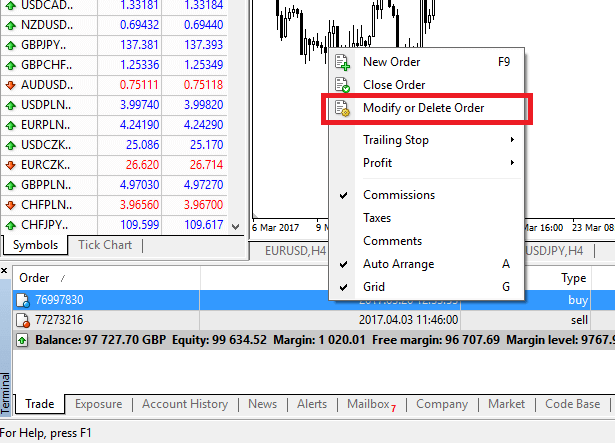
The order modification window will appear and now you’re able to enter/modify SL/TP by the exact market level, or by defining the points range from the current market price.
Trailing Stop
Stop Losses are intended for reducing losses when the market moves against your position, but they can help you lock in your profits as well.While that may sound a bit counterintuitive at first, it’s actually very easy to understand and master.
Let’s say you’ve opened a long position and the market moves in the right direction, making your trade a profitable one at present. Your original Stop Loss, which was placed at a level below your open price, can now be moved to your open price (so you can break even) or above the open price (so you are guaranteed a profit).
To make this process automatic, you can use a Trailing Stop. This can be a really useful tool for your risk management, particularly when price changes are rapid or when you’re unable to constantly monitor the market.
As soon as the position turns profitable, your Trailing Stop will follow the price automatically, maintaining the previously established distance.
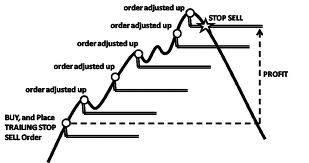
Following the example above, please bear in mind, however, that your trade needs to be running a profit large enough for the Trailing Stop to move above your open price, before your profit can be guaranteed.
Trailing Stops (TS) are attached to your opened positions, but it’s important to remember that if you have a trailing stop on MT4, you need to have the platform open for it to be successfully executed.
To set a Trailing Stop, right-click the open position in the ‘Terminal’ window and specify your desired pip value of distance between the TP level and the current price in the Trailing Stop menu.
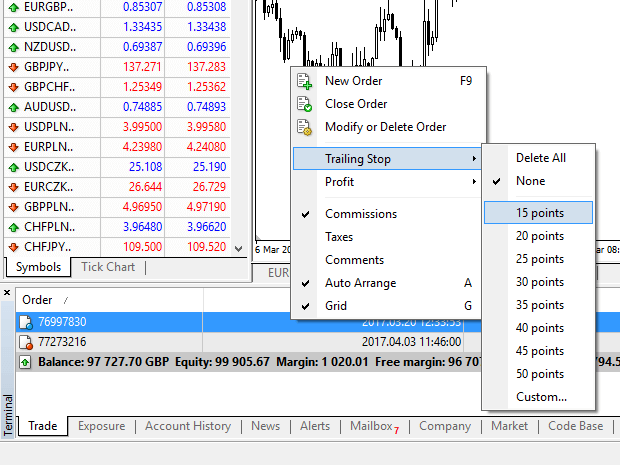
Your Trailing Stop is now active. This means that if prices change to the profitable market side, TS will ensure the stop loss level follows the price automatically.
Your Trailing Stop can easily be disabled by setting ‘None’ in the Trailing Stop menu. If you want to quickly deactivate it in all opened positions, just select ‘Delete All’.
As you can see, MT4 provides you with plenty of ways to protect your positions in just a few moments.
*Whilst Stop Loss orders are one of the best ways to ensure your risk is managed and potential losses are kept to acceptable levels, they don’t provide 100% security.
Stop losses are free to use and they protect your account against adverse market moves, but please be aware that they cannot guarantee your position every time. If the market becomes suddenly volatile and gaps beyond your stop level (jumps from one price to the next without trading at the levels in between), it’s possible your position could be closed at a worse level than requested. This is known as price slippage.
Guaranteed stop losses, which have no risk of slippage and ensure the position is closed out at the Stop Loss level you requested even if a market moves against you, are available for free with a basic account.
Frequently Asked Questions (FAQ)
Currency Pair, Cross Pairs, Base Currency, and Quote Currency
Currency pairs can be defined as the currencies of two countries combined together for trading in the foreign exchange marketplace. Some examples of currency pairs can be EURUSD, GBPJPY, NZDCAD, etc.A currency pair that does not contain USD is known as a cross pair.
The first currency of a currency pair is called the "base currency", and the second currency is called the "quote currency".
Bid Price and Ask Price
Bid Price is the price at which a broker is willing to buy the first named (base) of a currency pair from the client. Subsequently, it is the price at which clients sell the first named (base) of a currency pair.Ask price is the price at which a broker is willing to sell the first named (base) of a currency pair to the client. Subsequently, it is the price at which clients buy the first named (base) of a currency pair.
Buy orders open at Ask Price and close at Bid Price.
Sell orders open at Bid Price and close at Ask Price.
Spread
Spread is the difference between the Bid and Ask prices of a particular trading instrument and also the main source of profit for market maker brokers. The value of spread is set in pips.Exness offers both dynamic and stable spreads on its accounts.
Lot and Contract Size
Lot is a standard unit size of a transaction. Typically, one standard lot is equal to 100 000 units of the base currency.Contract size is a fixed value, which denotes the amount of base currency in 1 lot. For most instruments in forex, it is fixed at 100 000.
Pip, Point, Pip Size, and Pip Value
A point is the value of price change in the 5th decimal, while pip is the price change in the 4th decimal.Derivatively, 1 pip = 10 points.
For example, if the price changes from 1.11115 to 1.11135, the price change is 2 pips or 20 points.
Pip size is a fixed number that denotes the position of the pip in the price of an instrument.
For example, for most currency pairs like EURUSD where the price looks like 1.11115, the pip is at the 4th decimal, thus the pip size is 0.0001.
Pip Value is how much money a person will earn or lose if the price were to move by one pip. It is calculated by the following formula:
Pip Value = Number of Lots x Contract size x Pip size.
Our trader’s calculator can be used to calculate all these values.
Leverage and Margin
Leverage is the ratio of equity to loan capital. It has a direct impact on the margin held for the instrument traded on. Exness offers up to 1:Unlimited leverage on most trading instruments on both MT4 and MT5 accounts.Margin is the amount of funds in account currency that is withheld by a broker for keeping an order open.
The higher the leverage, the lesser the margin.
Balance, Equity, and Free Margin
Balance is the total financial result of all completed transactions and depositing/withdrawal operations on an account. It is either the amount of funds you have before you open any orders or after you close all open orders.The balance of an account does not change while orders are open.
Once you open an order, your balance combined with the profit/loss of the order makes for the Equity.
Equity = Balance +/- Profit/Loss
As you already know, once an order is opened, a part of the funds is held as Margin. The remaining funds are known as Free Margin.
Equity = Margin + Free Margin
Profit and Loss
Profit or Loss is calculated as the difference between the closing and opening prices of an order.Profit/Loss = Difference between closing and opening prices (calculated in pips) x Pip Value
Buy orders make a profit when the price moves up while Sell orders make a profit when the price moves down.
Buy orders make a loss when the price moves down while Sell orders make a loss when the price moves up.
Margin Level, Margin Call and Stop Out
Margin level is the ratio of equity to margin denoted in %.Margin level = (Equity / Margin) x 100%
Margin call is a notification sent in the trading terminal denoting that it is necessary to deposit or close a few positions to avoid Stop Out. This notification is sent once Margin Level hits the Margin Call level set for that particular account by the broker.
Stop out is the automatic closure of positions when the Margin Level hits the Stop Out level set for the account by the broker.
There are multiple ways to access your trading history. Let us take a look at them:
How to check your trading history
1. From your Personal Area (PA): You can find your entire trading history in your Personal Area. To access this, follow these steps:
b. Go to the Monitoring tab.
c. Select the account of your choice and click All transactions to view your trading history.
2. From your trading terminal:
b. If using MetaTrader mobile applications, you can check the history of the trades performed on the mobile device by clicking on the Journal tab.
3. From your monthly/daily statements: Exness sends account statements to your mail both daily and monthly (unless unsubscribed). These statements contain the trading history of your accounts.
4. By contacting Support: You can contact our Support Team via email or chat, with your account number and secret word to request account history statements of your real accounts.
Conclusion: Start your Easy Forex trading journey with Exness
Registering and trading Forex on Exness is a straightforward process that can be accomplished in just a few steps. By following this guide, you can quickly set up your account, deposit funds, and start trading with confidence. Exness provides a user-friendly platform and a variety of tools to help you succeed in the Forex market, whether you’re just starting or looking to refine your trading strategies.

